
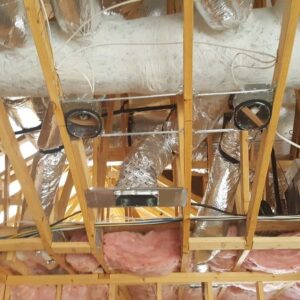
Image source: Langbeen Builders
HVAC rough-in includes all the HVAC ductwork and units that operate behind the scenes of a complete HVAC system. This installation stage focuses on the layout of pipes and vents during the early stages of building construction – whether it is residential or commercial. Generally, during the HVAC rough-in stage, there is only the bare-minimum wood framework to begin with, which means that the walls and utility lines are absent. Plumbing and electrical rough-ins come next and tend to overlap with the HVAC rough-in. For this reason, it is important to get the installation perfect with the help of a professional HVAC contractor. All the ductwork needs to be installed in the attic, basement, or crawlspace according to your specific requirements as a homeowner or tenant. With a proper HVAC rough-in infrastructure, your team will be able to connect the actual heating and cooling units, creating a fully-functional HVAC system.
HVAC rough-in checklist
All HVAC rough-in costs are determined by the size of your project and its complexity. In general, you will find the following elements in a well-planned HVAC rough-in checklist.
Teams, permits, and layout plans
You will collaborate with all the MEP (mechanical, electrical, and plumbing) contractors for this part of the project.
This includes an HVAC contractor as well as plumbing and electricity teams to get all the technical frameworks right – and so everybody stays on the same page and tackles the required permits. This is to make sure that the HVAC rough-in is entirely compatible with the proposed plumbing and electrical lines that will follow next. Otherwise, you might have to redo the HVAC process so that the utility lines wrap around the ductwork properly – which will add to the final cost. Therefore, the HVAC rough-in stage comes after the framing is complete and before any utility lines are installed. The planning process will focus on CAD files to represent the ductwork layout and vent locations among other infrastructural details, so an architect or an engineer will join at this point. All of these professionals will together help you evaluate plans, project scopes, HVAC specifications, and compatibilities. For example, if the existing ductwork has to be replaced, you need to go through different possibilities for a better upgrade. This might include altering the old rough work as needed. Likewise, if you are installing the ductwork for the first time in an unfinished space, you need to confirm the right materials, ductwork size, and layout for maximum efficiency. Deciding where the ducts go (the attic or the basement) should be confirmed in the planning process. Once all the MEP and HVAC contractors mutually agree on the plan, the actual work can begin.
HVAC details
The next important checklist element is about the HVAC system itself. This should cover all the specifications required to meet your airflow and ventilation needs based on your building’s scope. You will confirm various details with your teams regarding the HVAC system. You can also ask them for a comprehensive breakdown of the HVAC framework to understand the costs better. Some of the HVAC details to be covered here include:
- Rough-in for new construction/replacement/retrofit project
- Building size and ideal HVAC coverage
- Ductwork material, size, and location
- Number of vents with their locations
- Required HVAC appliances
- Heating and cooling systems/fuel types
- Minimum clearance for each HVAC unit
- Electrical outlet availability near each appliance
- Rough-in insulation
- Ideal venting specifications for each unit
- Hidden or exposed ducting
- HVAC zones for automation
Inspection
With the rough-in correctly installed, you will need your local Building Department to inspect the layout for approval. This is important to make sure that your HVAC rough-in framework meets the building codes and is safe to use. It also gives the green light to the subsequent plumbing and electrical stages, allowing the teams to complete the utility setup before connecting the appliances. If the inspection goes as planned and everything is perfect, your MEP contractors and technicians will install the heating and cooling units and test them for safe usage. However, if the inspection reveals potential red flags, the teams will have to address those first and repeat the inspection before moving forward. For this reason, you can expect to incur a few inspection costs down the road, depending on how reliable and experienced your teams are.
HVAC rough-in costs
Now that we know the typical elements of an HVAC rough-in process, we can zoom in on the different costs more easily. Before diving into a sea of numbers, here is an average range to make things simple and give you a quick idea of how much you might have to pay. The cost for installing HVAC rough-in usually falls around $1,500 – $16,000 and can exceed the range depending on your project’s complexities.
Here are some crucial cost breakdowns to help you analyze the scope better and plan your budget accordingly with your MEP teams. (A quick reminder! It always helps to ask them for a detailed breakdown from their end in order to compare quotes more efficiently when you are still deciding on the right company to hire.) It is worth mentioning that HVAC rough-in costs are usually just about the ductwork and venting costs as opposed to the final HVAC system cost with the installed appliances – although some estimates do provide a consolidated figure for this category. The following cost elements will hopefully be an easy guide of what to expect.
Costs based on building types
Installing an HVAC system with ductwork can cost up to $16,000 and more based on your specific HVAC requirements and building types. These costs can average around $4,000 – $12,000 depending on your zip code as well. If you are looking at the costs based on your building type, here are the general options for HVAC rough-in installations:
- Unfinished home: up to $4,000
- Ductwork replacement: up to $6,000
- Retrofit/existing home: up to $18,000
You can see that installing HVAC rough-in in an unfinished home is the most affordable option, whereas installing it in an existing home is the most expensive one. This is because new, unfinished homes have bare-minimum wooden frames without any walls or completed infrastructure, allowing the ductwork to be laid out easily. On the other hand, a finished home or an existing home is already completed and does not have extra room to accommodate the ductwork and vents. To install the rough-in, your MEP teams will have to demolish the necessary structures, add holes for vents, navigate through crawlspaces/attics/staircases, and work around utilities. All of this is labor-intensive and will add to the final cost.
Costs based on linear and square footage
HVAC rough-in costs based on linear and square footage are as follows:
- Residential ductwork: $10 to $20 per linear foot
- Commercial ductwork: $25 and above per linear foot
For context, a 1,000-square-feet home that requires 150 linear feet of HVAC ductwork will cost you $1,500 for rough-in at the rate of $10 per linear foot. Commercial costs will generally double for the same residential square footage because of the higher demand per linear foot, so you can expect a minimum of $7,500 to install HVAC rough-in for an office.
Costs based on material and labor
HVAC rough-in costs are also determined by their material types. Flexible polyester ductwork is the cheapest option but comes with the drawback of frequent replacements.
Flexible aluminum is durable but not as durable as galvanized steel – which is also very expensive. If you are looking for a cost breakdown based on ductwork material, here is a brief summary of what you can expect:
- Flexible polyester: up to $4 per linear foot
- Flexible aluminum: up to $5 per linear foot
- Fiberglass board: up to $6 per linear foot
- Galvanized steel: up to $10 per linear foot
You will also consider the required sizes for your chosen ductwork. Quite often, HVAC rough-ins use different material combinations in the overall layout to configure the most energy-efficient route for your HVAC system. Your teams will include other hardware as well in the final itemized costs, so you might see duct fans, vents, elbows, joints, duct wraps, etc. in the list with their respective costs. Regarding labor costs, HVAC rough-in installations differ depending on their locations, ease of access, and project scope as we have seen so far. Generally, labor costs take up around $1,000 – $3,000 at the rate of $5 – $10 per linear foot for installation.
Costs based on heating/cooling types
A complete HVAC system includes furnaces, air conditioning units, ductwork, and thermostats if needed. The fuel type (gas, oil, electricity) is another option to determine the HVAC rough-in costs for ductwork installation.
- For unfinished homes: up to $4,000 (all fuel types)
- For existing homes: up to $18,000 (all fuel types)
- Replacements: up to $6,000
Influencing factors
So far, we have walked through a summary of the main HVAC rough-in costs that range from around $1,500 – $16,000 as we mentioned earlier. Naturally, the bigger the project, the higher the cost. If your teams need to work around tight corners to retrofit the existing space, any level of difficulty will simply add to the cost. Likewise, if you pick a more expensive ductwork material or have a complex requirement for each room, you will move towards the pricey end of the bargain.
A number of other factors can also influence this range, and here are some key considerations that you can bring to the discussion table with your MEP teams.
Local codes and permits
Different locations and their accompanying building codes directly impact the HVAC rough-in costs because your MEP or HVAC contractors will have to get the required permits before any work can begin. Permit fees for new HVAC ductwork installations can cost up to $1,500. So, your overall budget can fluctuate based on the number of things you are allowed to install in your building, especially if you are upgrading the old system, as this would mean demolishing AND rebuilding within the local code guidelines.
HVAC zones
If are planning to add smart HVAC zones, your final costs will increase due to the technical nature of zoning a space. Your teams will work on more ductwork and complex layouts to create a smart HVAC zone that is both functional and responsive. This includes adding thermostats to the system and installing the right HVAC units, so you would have to make sure that your building is actually equipped for such technologies – which brings us back to obtaining relevant permits! On the whole, zoning can add another $1,000 to your budget depending on your project scope and technical details.
Insulation
Ductwork insulation can also extend your budget by around $4,000. It is important to insulate ducts to improve their energy efficiency and reduce your bills. Adding insulation prevents energy losses from the moving air within the ducts, allowing your HVAC units to perform better and keep your rooms at the desired temperature. Without insulation, the ducts will allow more energy from the traveling air to escape easily, which will cause your HVAC units to overwork to maintain a steady temperature. Fiberglass ductwork is a good option for its insulation benefits, so you can choose fiberglass to save the additional cost of insulation layers for the ducts.
Conclusion
That was the end of our HVAC rough-in cost guide. If you want a more detailed and customized estimate for your project, consider the following cost calculators to receive more accurate quotes to plan your budget. You just need to enter your zip code and HVAC specifications to have the quotes emailed to you.
HVAC rough-in installation requires professional handling, so DIY pursuits are strictly off limits! This is because any mistakes in the installation can cause leaks within the ducts, reducing your HVAC system’s efficiency and slowly mounting to a complete failure. Installing the rough-in professionally takes around 5 to 7 days depending on the size of your project. Properly-connected ductworks last up to 20 years, which is a huge benefit if you take care of annual maintenance. Whether you choose low-end or high-end rough-in options, there should be no compromise on the installation quality if you are aiming for energy efficiency and reduced bills. Make sure to clarify your expectations early on with the contractors so that they can give you a relevant quote and come up with the best solution to optimize the available space, meet the local codes, and keep everything moving towards the deadline.